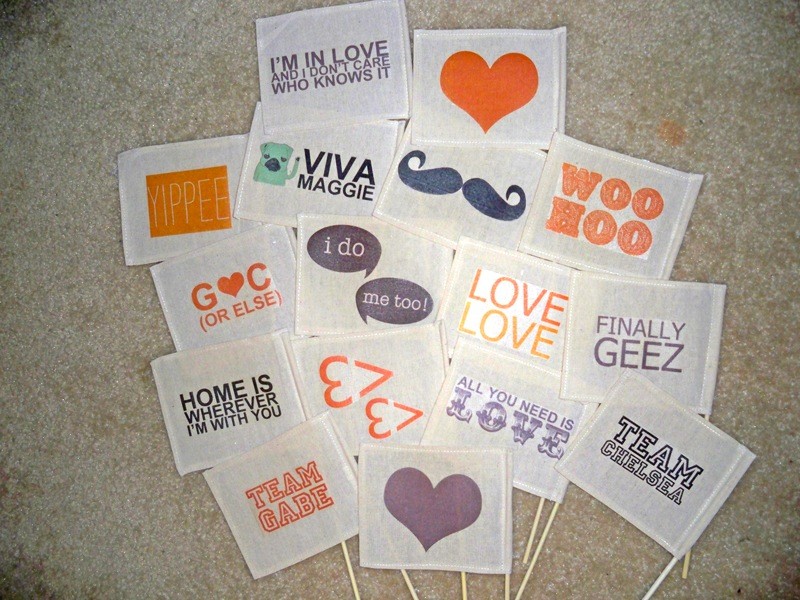
When I was looking for ways to add some cute DIY touches, I came across Oriental Trading's mini canvas flags (seen here) and the proverbial lightbulb clicked on. Being that 1) I can barely draw stick figures and 2) my artist boyfriend (I can't say fiance, it's still weird) is, well, lazy, I decided to decorate these bad boys with some iron-on transfers.
For this project you will need the following:
- Mini flags
- A computer
- Some sort of design program (I used Adobe's Photoshop and InDesign)
- Scissors
- Liquid Stitch or some similar adhesive
- Fabric transfer paper (make sure it is the transparent kind if you're using a light background!)
- An inkjet printer
- Pillowcases or t-shirts you don't care about
- An iron
- A flat work surface
- Optional: These designs (one and two) in PDF form, if you're not creating your own design.
STEP ONE:

First things first, if you go with the OT flags, the dowels have very pointy bottoms and they slide out of the flags. Unless you're trying to draw first blood at your wedding, do yourself a favor and snip the very tip of the pointed part so you just have a weak excuse of a pointy nub.
STEP TWO:

You'll notice the part of the stick that was actually inside of the flag is not potentially dangerous for the children for which these crafts were intended. Go figure, Oriental Trading.
Take a small bit of Liquid Stitch (or whatever) and put it inside the part of the flag where the stick came out of. I can't stress small bit enough; if you use too much, your stick will get caught. It only takes a little.
STEP THREE:

Turn the dowel around so that you're now inserting the once pointy part and slide it in quickly. They take just a few minutes to dry.
STEP FOUR:

Figure out the feel you're going for, and design your images on the computer. We've been together for seven years and we love our little pug Maggie, so I made silly ones like “FINALLY GEEZ” and “VIVA MAGGIE.” The flags are 6″ wide by 4.5″ high, so plug those dimensions into your design program so you know the workspace you have.
If you are using text, DON'T FORGET TO MIRROR IMAGE THEM. Most programs call this “flip horizontal.” (I won't name names, but someone forgot to do this and wasted two iron-on transfers.) I clustered several designs onto one piece of paper to make the most of each print.
Print your lovely designs, using an inkjet printer. I'm told this is very important; you should not print using a laserjet. I can't attest for the truth behind the warning, but I'm not ready to test the limit of our love by ruining the boy's other printer. Now get ready for mini flag magic.
STEP FIVE:
Plug in your iron and DO NOT put water in it. Then drape two pillowcases or t-shirts over your flat workspace. I used an IKEA lack side table and possibly melted part of it by only using one t-shirt so… use two.
STEP SIX:

Cut out your designs and try to stay as close to the edge as possible. Some text designs will show a clear film on the flag if you leave big gaps, but if you're not totally OCD like me, you'll live.
STEP SEVEN:

You'll probably need to iron your flags a bit first, then place your image over the flag and iron them on for a good 20 seconds.
Then put that flag aside to cool and move on to the next. (My rule of thumb was to iron six or seven before peeling the ones I'd already done, that way they had enough time to cool.)
STEP EIGHT:


Peal off the iron-on decal and voila! You're done!
STEP NINE:

Clean up the mound of papery mess all over your floor and have some fun waving your silly little flags around.

I plan to use them for photo booth props and for people to wave after the ceremony. They can also double as additional party favors if anyone wants one. If you have any left over, stick one in a flower pot or throw a few in a small vase for some decorative cute and a reminder of your big day.


