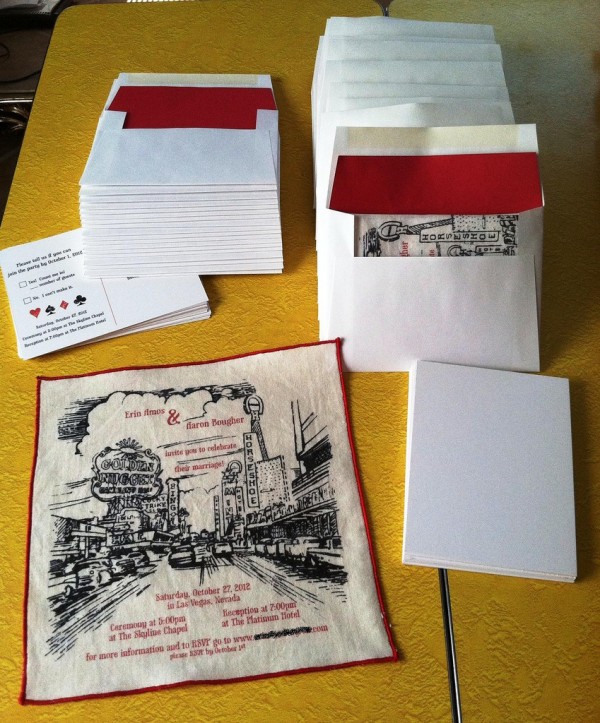
 When we started looking for wedding invitations, we only had one requirement. It had to be something that our guests hadn't seen before. Well, maybe two. We're on a super tight budget, so they had to be cheap! I fell in love with these tea towel invitations, but they were way out of our budget. Being the crafty gal that I am, my brain started swirling with ideas. For years my grandma has been using a product called Bubble Jet Set to make things like photo quilts. It's this amazing stuff that lets you print onto fabric using you home printer, and when you're done it is permanent and safe for machine washing and drying. (I know… it's awesome!)
This technique can be used for so many things. Goodie bags with your wedding logo? Dual purpose hankie wedding programs for those guests who get teary eyed at the ceremony? The possibilities are endless! So here is how we made our handkerchief wedding invitations…
Supplies:
- Cotton fabric (I've only ever used cotton, so I can't tell you if synthetic fabrics will hold the ink properly)
- Freezer paper
- Bubble Jet Set
- Small, shallow tray, such as a 9″x13″ baking dish
- Rotary cutter, ruler, and cutting mat
- Iron and ironing board
- Inkjet printer, and new ink cartridge(s)
- Serger sewing machine, or regular sewing machine if you're willing to do a little more work
Once you've got your design ready, the fun begins.
The invitation size is limited to 8″x8″ because our printer has a maximum width of 8.5″ paper. For this, I'll be using 8.5″x11″ paper, but you could really do whatever size you want if your printer will handle it. (If you have a wide format printer, then you can make bigger things!)
Calculate how much fabric you need. If you are using 44″ wide fabric you can get 12 invitations from one yard. We got our fabric from Walmart for $2 per yard. The fabric really looked vintage, which is exactly what we wanted. For 40 invitations I bought 4 yards and had a little left over.
 You can totally make your own linen invitations
Tribe member ManaKR made linen invitations. Keep reading to find out how to make these yourself. Just imagine the possibilities -- badass pirate invites? Renaissance... Read more
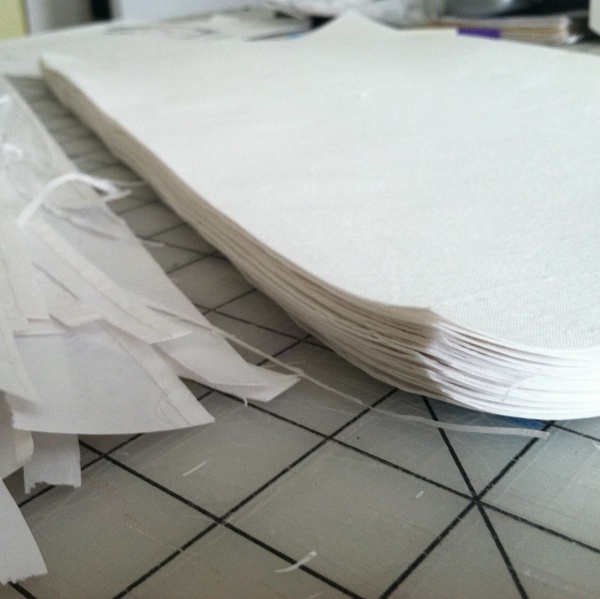
Wash and dry your fabric. I suggest trimming the cut ends with pinking shears, or stitching down the edge with a zig-zag stitch to prevent fraying.
While the fabric is in the wash, cut the freezer paper into 8.5×11 sheets, until you have enough for one for every invitation. (or skip this if you have the pre-cut paper)
Once the fabric is dry, iron out all the wrinkles. Cut it into 12″x 9.5″ pieces. If you're using very cheap fabric like we did, look out for blemishes and work around them.

Pour some Bubble Jet Set into your baking dish, enough to cover the bottom of the dish. Lay in about 10 pieces of the fabric that you just cut. Pour the rest of the bottle over the top. (Don't worry, you can pour the extra back into the bottle to reuse it later.) Make sure that all layers are completely saturated. Let it sit for five minutes.
Take each piece out and gently squeeze it just enough so that it isn't soaking wet and dripping all over and hang up to dry. Repeat until all your squares of fabric have been treated. Use a funnel to pour the extra liquid back into the bottle to use again.

Once your fabric squares are dry, you have to attach them to the paper so they can go through the printer. Pour out all the water in your iron, and set it to medium high. Once it's warmed up let it steam a minute so that all the water is evaporated. Iron all the 8.5×11 sheets to the fabric with the wax side of the paper to the fabric. Iron until the paper is completely stuck to the fabric. Be sure to get the paper straight, especially if the grain of the fabric is very noticeable.
Use the rotary cutter to trim the fabric to the edges of the paper. Trimming the paper a teeny bit smaller is better than any fabric hanging over the edge of the paper.

Now you're ready to print!
If it's been a little bit since you ironed the paper onto the fabric, you may notice that it is starting to curl up on the edges. That's because the wax paper came from a roll. You want the paper as flat as possible when it's going through the printer, or else the curled edge of the paper will hit the print head and cause smears all over your fabric. The same goes for wrinkles in the fabric. It must be absolutely smooth. To prevent this, I ironed each piece one more time right before I fed it into the printer.
Make sure your print settings are for regular paper, and high quality. They're in different places on every printer, so you may have to look for it.

Feed the sheets through the printer one by one. This is the tedious part. For some reason, I felt the need to watch each one printing just to make sure that it didn't mess up. I didn't make many extras so I was scared that I would ruin too many and have to make more.

Once they are all printed, it's time to rinse them. Wash out your baking dish and fill about half way with clean water. Add about 1 tbsp of mild detergent to it and swirl it around a little to distribute it. Peel each of your printed pieces of fabric off of the paper backing and lay it into the dish. Gently swish it around. You'll see the Bubble Jet Set coming off and turning the water a milky white. Be careful not to rub the printed parts of the fabric together. You don't need to vigorously wash it, but just enough to get all the Bubble Jet Set off.
(Note: It says on the bottle that you can also wash them in your washing machine on delicate. I DO NOT recommend this. I tried this and it made gray spots all over my fabric. I don't know if my washing machine was dirty, or if it was the ink coming off of the fabric, but they would not come out. Plus, it unravels the edges of the fabric pretty bad.)
Hang them to dry. Try not to stretch the fabric, or it will dry that way and your image will be skewed. This is where a fan comes in handy to speed up the drying process. Once you've gone through all this hard work, you just want to hold the finished product in your hand!
After it's dry, use your rotary cutter to cut clean, straight edges.

Finish the edges with your sewing machine. Either use a serger (see below) or a regular sewing machine and give it a rolled edge hem.
I used my serger, which I think was faster and gave it a very vintage look. Set your serger to the shortest stitch setting and set it up for 3-thread sewing. Sew all the way around the outside of the invitation. Cut the threads at the end flush with the edge of the fabric.
Bonus tutorial in a tutorial: How to sew perfect serger corners. I'm sure there are better tutorials somewhere online, but this is how I did it. Give it some practice on some scraps a couple times before you do it on an invitation.

And now is the part where a fiance that can follow directions well comes in handy. Assembly!
I used envelopes that are 4.25″x5.5″, which works perfectly for the 8″x8″ invitations. I cut white cardstock to 4″x5″ pieces and folded the invitations around it so that the top middle of the invitation was showing when the envelope was opened. I used red cardstock to line the envelopes, and also added an RSVP postcard.

After everything was done, we had awesome custom invitations for under $1 each. Pretty sweet, huh? If one of you makes something using this technique please share some pictures, I'd love to see it!


