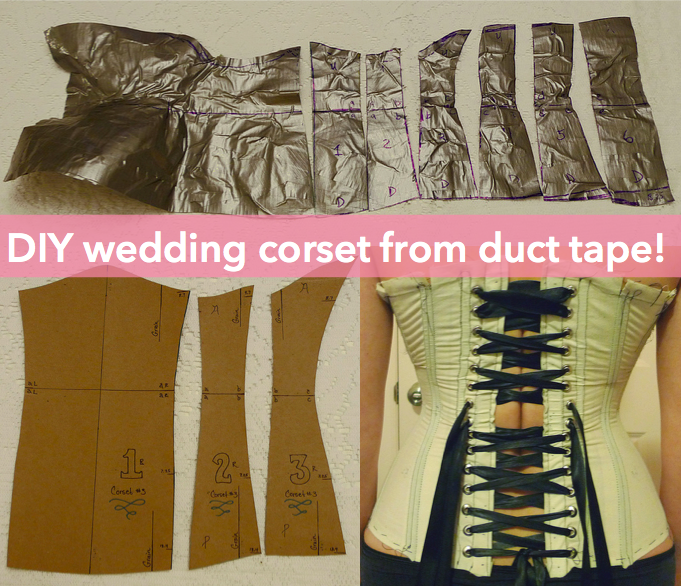
I decided to make my own corset for a combination of reasons. Foremost, while my horizontal measurements are pretty average, my vertical ones are not (read: I'm a shortie). This means that standard corsets jab me in the armpits constantly. I also didn't have the $250-600 to indulge in a custom made corset. So of course, it was off to DIY!
It is completely possible to buy a pattern to make a corset for yourself, but if you have non-standard measurements, there is a decent chance that the pattern will require a high amount of alteration anyway.
So why not just make a completely custom corset pattern, fitted exactly to you, with duct tape?
I did, and it has been awesome, even for me as a beginner. I followed this fabulous youtube tutorial series from Lucy of Lucy's Corsetry.
Even though this is a pretty darn thorough series, it's hard to cover EVERYTHING, so that is why I've written this post. To fill in gaps, to talk about the experience of going through the tutorial, and to generally share everything I learned!
Making the duct tape model:
- Making the duct tape form with my partner was surprisingly sexy. Bralessness + groping opportunities = yay!
- The duct tape tends to peel away from the shirt once you've cut them both off your body. We had to peel off the shirt, and add duct tape to the back of the first duct tape layer, to keep it from sticking to itself and everything else.
- Listen to Lucy: do not forget to mark center front, center back, and the waistline on your duct tape form! The waist line is especially important during pattern making.
The Duct Tape Pattern:
Step 1: The videos do not offer that much guidance on deciding how to divide the duct tape form into pattern pieces. I understand why — there are an infinite number of ways to go about patterning a corset! Still, I was a little lost about how many pieces to cut, whether they should be cut on a bias, how to pin or stitch them, whether they should be equally sized or uneven, how they should be shaped, etc. so:
- I decided to make my panels nearly even in width just for simplicity. This is very functional and looks good, but it is not as beautiful as the seaming in some corsets.
- I decided on six panels to each half of the corset, because error increases with the number of pattern pieces (and error piles up over 10+ slender pieces of fabric!). I wanted enough panels for serious rigidity, but not so many that my modest sewing skills would be overwhelmed.
- I tested different seam shapes by drawing on the form with sharpies and “erasing” with rubbing alcohol, until I found something I liked.

Creating the Paper Pattern:
Step 1: Get ready to go through a couple drafts of patterns. After tracing the duct tape pattern pieces onto paper, you have to decide how much you want the corset to reduce your horizontal dimensions and how wide you want your lacing gap, then subtract these amounts over your many pattern pieces. Mistakes are inevitable and fabric behaves differently from duct tape, so test, test, test!
Step 2: Buy your boning, grommets, grommet setter, and laces now, so that you'll have them by the time you're ready to make a final, boned muslin. I invested in laces made specially for corsets after watching my sister's bridesmaids struggle with her random yards of ribbon from the fabric store — they got burned hands and the stuff broke twice!
Step 2.5: Make a pattern of your original duct tape pieces with no reduction. This way, if your first reduced pattern doesn't work, you won't have to trace the actual duct tape again (a finicky job), but can use this un-altered pattern.
Step 3: Remember, even if you don't want the corset to reduce your hips or underbust/bust, you still need to take width off these areas so that there will be a lacing gap in the back.
Step 4: Corsets seem to work the opposite of most garments; it's better to make them slightly too small than slightly too big. (I'm talking a little bit, here. It is possible to have a too-small corset!) You can allow a wider lacing gap if it's too small, or pull the laces a bit tighter, but if the corset is too big, the back panels start to touch and you can't tighten the laces any further. So don't bother being cautious when deciding on your waist reduction and the width of the lacing gap. I took a full six inches off the waist — two for the lacing gap, and four for the actual reduction, even though I only intend to pull the corset tight enough to reduce myself by two inches. Funny thing is, the corset fits better this way!
Step 4.5: If you're going for a big waist reduction (more than five inches), you will need space for that flesh to move to, so make your underbust and hip measurements roomy!
Step 4.75: Record your alterations. You may go through several patterns; chances are you won't remember exactly what you did each time.
Step 5: Notate the fuck out of your pattern pieces! Number them and mark so that you know how they join. Use a line perpendicular to the waistline as your fabric grain line. Proper notation saved me so much hassle!

Muslin Making:
Step 1: You only need to make one “copy” of your pattern in muslin per fitting. If you're using the sandwich construction method on the final corset, you will eventually need to make two “copies,” and sandwich the boning between them. There is no need to make both copies at this stage, though, since you'll likely be adjusting anyway.
Step 2: You will need to lace up somehow in order to alter the fit. As I learned, it's really hard to see what needs to be done if you're just holding it together behind your back. I just marked spots and used thread to lace in the early stages when I was looking at the general fit. Once I got to the boned muslin, I put in grommets and lacing because I wanted to really perfect the fit, and I needed to be able to really lace up tight to do that.
Step 3: For the boned muslin, I made the boning channels by pressing open the seams and sewing one side down to make the channel. I will not do this in the final corset! Is only for fitting purposes! I used zip ties as mock-bones for all the ones that would be spiral steel, but I used the actual white spring steel ones for the last two channels (to get a good idea of the final rigidity). I used some crappy grommets I had lying around so that we could really pull the laces taught without ripping holes in the fabric.

Muslin Review:

Muslin One: I am holding the back edges tight and parallel behind by back. You can see how big this thing is in the hip and underbust at this point, since I forgot to reduce them by the amount of the lacing gap.
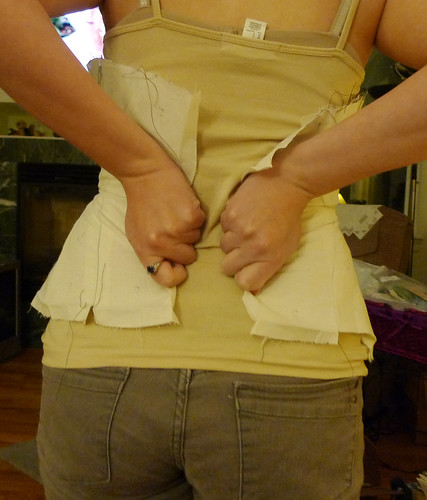
Muslin One again.: Freakin' huge, even in the waist.

Muslin Two: Better, but the underbust is too high (though not by that much – the corset had shifted up on my waist. The black marks at the bottom edge show how much width I could take out of the hip (3.5 cm on each side).
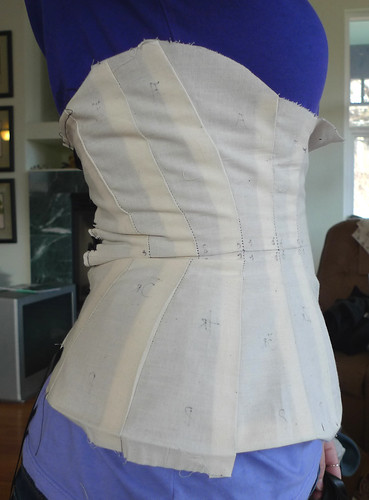
Muslin Two: Had problems with the fabric folding under pressure at the sides and back. At the time, I was super worried that the final corset would also have this problem, but it turned out that boning fixed everything. This was good, as I like to bone.

Muslin Two: The top and bottom edges look parallel, but they aren't evenly tightened. If they were evenly tight, they would have been all wonky angles. I couldn't pull in the waist properly without boning in, but it looked about right.
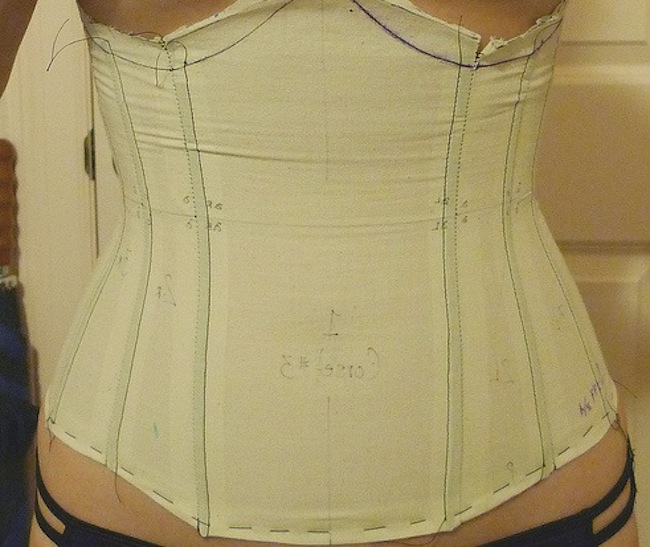
Muslin Three: Purty! I tried this on without boning or interfacing and it fit pretty well, so I basted the bottom edge (sewed the seam loosely) and put in boning. It fits fucking great.
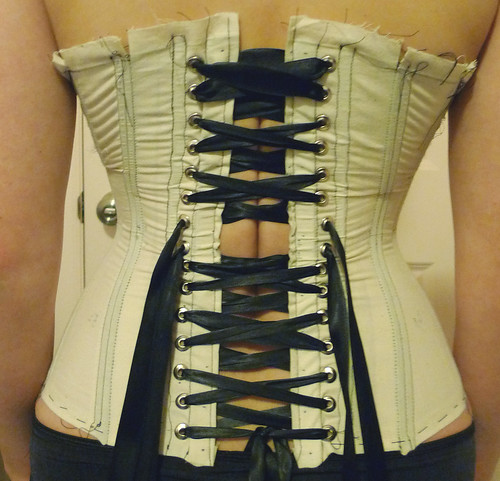
Muslin Three back view: The lacing gap is pretty small, but that's okay. The edges of the gap are nearly parallel, which is awesome. I am satisfied enough to move to the final fabric!! Also, holy venus fold, batman!
So that's that! I don't claim to be any sort of expert, this is just what I gleaned from the experience. The whole pattern making and fitting process took ~2 weeks of working on it every other night. I left nights in between because muslin making can be frustrating – it sucks when you've spent all this time making a new pattern and sewing a new muslin and it still doesn't work!
Overall, though, it wasn't that difficult. I'm not even an intermediate sewist and I could do this. I should note that, like many DIY projects, it wasn't actually cheap, just cheaper than the alternative (I'm at ~$110 on corset materials, tools, and cotton / canvas fabric, and thread). Still, I would definitely encourage people to give this a try – it is, somewhat ironically given the nature of a corset, freeing!


