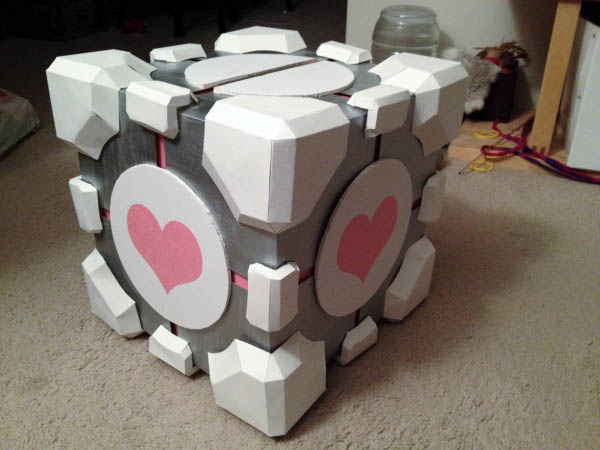
We were inspired by this post on Craftster to make a Companion Cube card box. And then we found the basis for our templates (to which we made some crucial modifications) over here. But we had to make a bunch of mods to make these work the way we wanted them to, and it was kind of terrifically complex. So I figured in case anyone else wanted to give this a try, I'd post what we did to help ease the process for y'all. So here goes…
Materials:
- 12x12x12″ box from the UPS store
- Pink construction paper
- 3-pack of plain white foam board
- 1 large piece of white poster board
- Several sheets of 8.5×11″ white cardstock, and a printer to print stuff on them
- X-Acto knife (4 tips on using an X-Acto knife without it ending in bloodshed)
- Safe surface to cut on top of (I used an old magazine)
- Metal ruler(s)
- Scissors
- Silver or gray acrylic poster paint
- 2 packs of Zots
- Glue stick
Process:
Step 1: Tape the box shut on all sides with packing tape.
Step 2: Mark the center of the top and bottom of the box (two of the smooth sides, not the sides with flaps).
Step 3: Around that center, mark and then cut (with the X-Acto knife and ruler) a 1×7″ slot on the top of the box. (This is where the cards will enter)
Step 4: Flip the box over, and cut an approximately 5″ square flap in the bottom, at a 45-degree angle to the sides (I did this by penciling in the midlines of the sides of the box at a 90-degree angle, and then connecting them at even distances from the center). ONLY CUT THREE SIDES OF THIS SQUARE. You want a flap here, not a hole. (This is how you'll take the cards out again.)
Step 5: Grab your pink construction paper. You'll need three sheets. Cut each one into four even strips, the long way. They don't need to be tidy at the edges; all the edges will be covered.
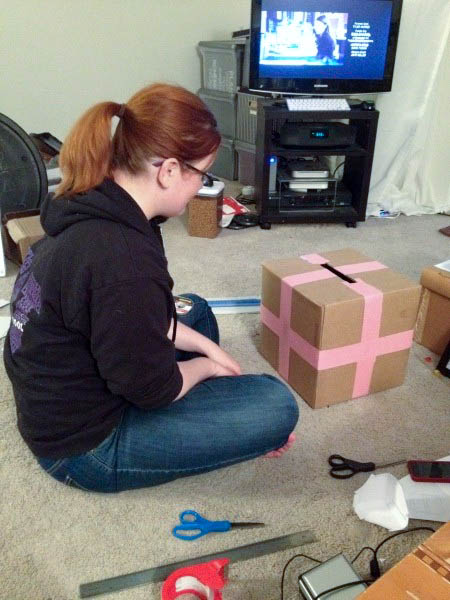
Step 6: Take your strips and connect the midpoints of each side of your cube, as shown in the picture. I just used Scotch tape. (Note: you'll have to cut the strips a bit shorter to connect them to the bottom, otherwise you'll tape your flap shut.) You may also want to tape in additional construction paper around the opening of the card slot, since that will show a little bit.
Step 7: Cut out 20 squares from one piece of foam board, each 4.5″ square, using your metal ruler and X-Acto knife.
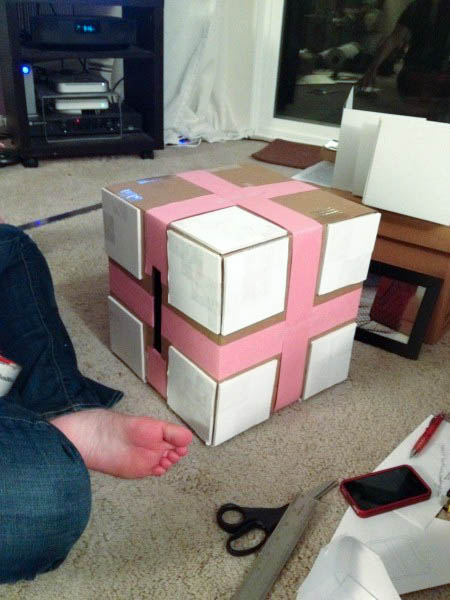
Step 8: Attach three foam squares to each corner of your box, as shown. (We used packing tape, but Zots would have probably worked better. I only remembered we had them about halfway through.)
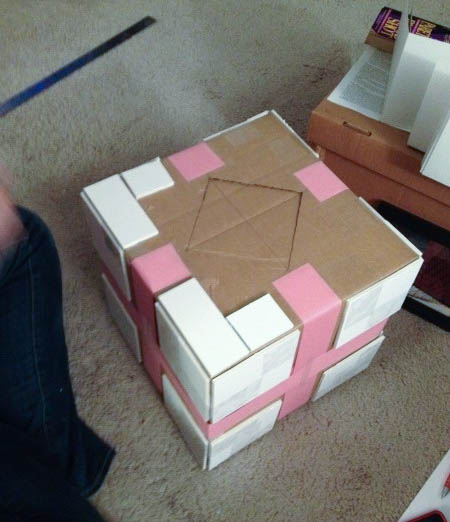
Step 9: For the bottom, use small scraps of foam board to fill in the corners around the flap.
Step 9: Measure your actual box (not including the foam board squares). Ours wasn't actually 12″ on every side, it was 12.25″. You're going to use half that dimension to make the next piece. [Apologies: there's a gap in the photos here.]
Step 10: To make the corners, you'll need to cut sort of 3-square L-shapes out of poster board (not foam board), with a flap on one of the inner edges of the L so you can stick it shut. You'll need 8 of these.
Step 11: Paint your corner pieces with the acrylic paint. I found it easiest to position them over the corner of a file box we had sitting around that we didn't mind getting paint on, then paint the surface was on top, turn it, paint the next surface, and so on. Then I'd move each piece to a different corner of the box to dry while I kept painting more. (They dried really quickly.)
Step 12: Cut four of them so they will fit around the flap on the bottom (they need to be triangles rather than squares).
Step 13: Once all your corner pieces are dry, stick them on. We used loops of packing tape again here, but double-sided tape or Zots would have been way easier. Mainly you need to make sure you get them to stick well around the center of each side.
Step 11: Okay, now you have all your silver bits stuck on. Bravo! You may have noticed that they're all at crazy angles though, if your box is anything less than perfectly square. To fix this, first figure out which of the pink stripes (where the construction paper shows between two silver bits) is the widest. Ours was about .5″. Then carefully trim the rest of the pieces to create the same space between them, using an X-acto knife, metal ruler, and a scrap of foam board under where you're cutting (a T-square may also help). You'll come out with something that looks like this:
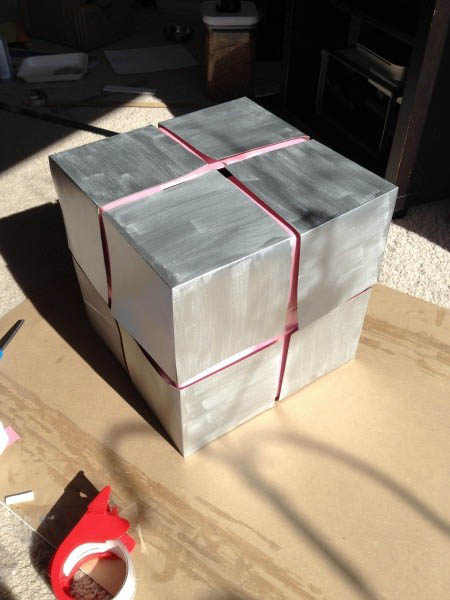
Step 12:Cut some more, smaller squares of foam board out and stick them in the centers of each side, under the corners of the silver poster board pieces, to hold them up. Our pieces there were about 2×2″.
Cut even smaller rectangles of foam board and stick them beneath the midpoints of each side. These ones were about 0.75×2″ for us, and you'll need two for each edge (24 total). Zots or double-sided tape are by far the easiest way to stick these on.
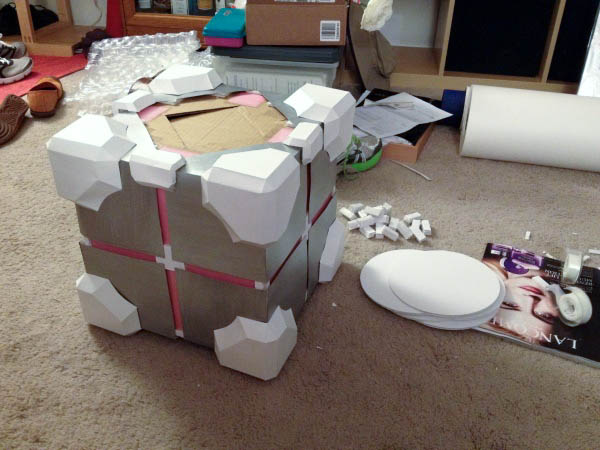
Step 13: For the corners and edge pieces… This part was super tedious and time-consuming. We fiddled with the template linked above in a few ways — mainly, we made it bigger and also added tabs to make it easier to stick together.
Step 14: Print out 8 corner piece templates and 12 edge piece templates on your 8.5×11″ cardstock. Cut them out. Pre-fold them along each of the fold lines in the template, and then stick them together using whatever works. (We used a combination of Scotch tape, Zots, and a glue stick.)
Step 15: To stick them on, you'll need more little bits of foam board, from which you'll make little foam-board layer cakes. The corner pieces take three-layer cakes (24 of them); the edge pieces take two-layer cakes (also 24 of them). These were all about 0.5×1.25″, I think, and easy to stick together with Zots or tape.
Step 16: Stick two Zots (or a piece of double-stick tape) to each side of each 3-layer sandwich, and then stick it to the flat part of a corner piece. They seem to support best if the long edge runs from the corner to the center of the box as a whole. Once you've got three 3-layer sandwiches in a corner, stick it onto the box. (Carefully! It's really easy to get premature stickage.)
Step 17: For the edge pieces, do the same thing, except stick the 2-layer sandwiches to the box rather than to the paper, as close to the edge as possible (2 per edge piece).
Step 18: Finally, the circles. I'm actually not sure what the exact dimension of these was — we just used a salad plate to trace circles onto the foam board (5 of them), then carefully cut them out with the X-Acto knife (also around the plate). You'll have to cut on both sides of the foam board to get them out, so it's easiest to position each one in a corner so you know how to line up the plate on both sides.
Step 19: Make the hearts by printing 4 of them on one sheet of construction paper, then cutting them out. (I used OmniGraffle‘s heart stencil for this.) Stick them to the circles with a glue stick.
Step 20: Finally, stick the circles to the box. We used a glue stick, but double-sided tape or Zots would've also worked. For the top one, first place it in the right spot without sticking it down, and use the ruler and a pencil to mark where the pink stripe lines up around the card slot. Then take the top circle over to a cutting surface and cut out that strip, then cut the strip in half and use the halves to prop up the edges of the silver bits around the card slot. Stick on the last two circle-halves.

And that's it!
This was a super-involved process, and took most of a whole weekend with both of us cutting and pasting and folding furiously for most of an afternoon. But we think it turned out really well! And now we'll have a nice fiancé's interest-oriented counterpoint to the library card catalog piece we're using for the escort cards (he's a gamer; I'm a librarian). Hooray!


OMG thank you!! You have no idea how perfect this is, I have been searching the web on how to do this. I’ve been pretty laid back during the engagement process and the one thing that I have been insisting on is a Companion Cube card box. Thank you for your tutorial!
My OH just looked over, saw this tutorial, gave me puppy eyes and asked “can we?”
Well, duh! Thank you so much, you’re a genius!
You have no idea just how happy this made me. I have known for a while now that I wanted a companion cube card box but just had no idea how I would pull it off. I am SO excited to have found this tutorial. I will be going to the craft store and getting started today!
Thank you so much! I found this site after frantically web-surfing for a few hours. This is perfect! I will be using this tutorial with a few variations……(I need a date to my last high-school formal and have no friends….I will be scoring geek points.)
Im trying to make this for my sons valentine’s box, and im overly tired, but i dont understand what you meant in step 10, could you please let me know. .. im sorry, i know i probably sound stupid but id greatly appreciate help!