 Check out this flower child and Mother Earth fabulousness. I am digging some big-ass colorful flowers for a spring wedding headpiece. How gorgeous would this look with something like this vintage-inspired dress or this bohemian sleeved dress?
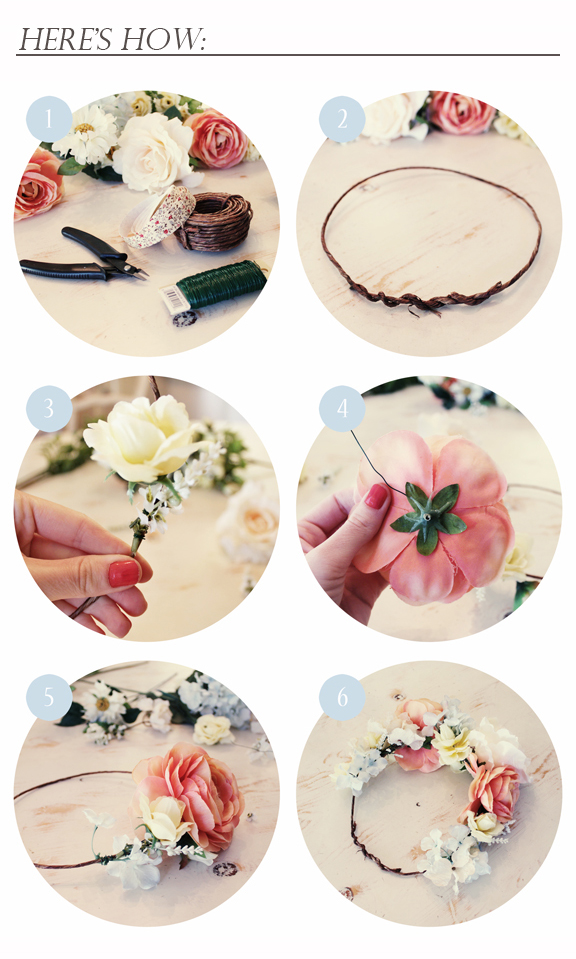
If you want to craft your own, you'll need a few things: silk flowers, wire cutters/pliers, heavy floral wire, thin floral wire to attach the flowers, and floral tape or ribbon.
The trick is to make the heavy floral wire crown part a little bigger than you think you need due to the ends of the flowers taking up space. Then it's a matter of attaching your chosen flowers to the base with the thin wire and smoothing all the edges with tape, if needed. Keep all those poke-y bits from digging into your head.
You can also use much smaller flowers if you're looking for something more subtle. But in this case, my motto is “more is more, bitches.” Speaking of more, here are more detailed steps:

Head over to Kelly Murray's blog for more detailed instructions and photos to help you along.
We've got a whole tag archive of flowers in hair, so go peek for more inspiration. Ooh, and here is some colored hair and flower combination fun, too!
Offbeat Wed Vendor
This page features vendors from our curated Offbeat Wed Vendor Directory. They're awesome and we love them. If you're a vendor let's get you in here!


I did something similar but created a grid with floral wire which I attached to the headband. That way, I can weave in real or silk flowers and change up the look whenever I want.
I LOVE that idea!
Will the floral wire get caught in dreads? :/
Honestly, It can but I’m sure if you wrap the wire it would be ok.
Interesting. What would I wrap it with? I would love one of these, but only if it won’t get stuck in my hair!
wrap it up with floral tape or with ribbon!
You can also do a variation of the crown that is adjustable by making loops on each side of the wire and using ribbon to tie it to the right size.
Fun craft idea for any occasion! I love the inspiration behind it and the easy DIY steps and photographs. 🙂
What a great idea. I’m really looking forward to having a bash at these ideas. Great inspirational ideas, well illustrated, and even for a clutz like me, achievable. Thanks